
The Best Guide on How To Group Rows in Excel
Feb 20, 2025
Did you know you can group rows in Excel for better data analysis?
Grouping in Excel allows users to organize related rows into collapsible sections. This feature is particularly useful when dealing with categories, summaries, or nested data structures. You can collapse data sections when they’re not needed and expand them when necessary.
In this guide, you'll learn how to group rows in Microsoft Excel using simple, step-by-step instructions.
Preparing Your Data for Grouping
Before grouping, ensure your data is structured properly. Here are some steps you can take to achieve
-
Avoid blank rows and columns – Excel may not recognize patterns correctly if there are too many gaps. So, you should remove all blank rows.
-
Ensure consistency – Data should be formatted properly (e.g., numbers as numbers, dates as dates).
-
Consider adding summary rows – If you plan to use subtotals, having summary rows makes analysis much smoother.
How to Group Rows in Excel
Whether you're working with large datasets, financial reports, or structured lists, grouping can help improve efficiency and clarity. Below are different ways to group rows in Excel, along with step-by-step instructions.
1. Automatic grouping (Auto Outline).
Excel can automatically detect grouping patterns and create collapsible sections using the Auto Outline feature. Here’s how:
-
Select any cell within your dataset.
-
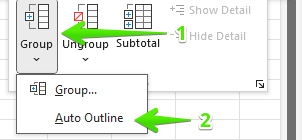
Navigate to the Data tab on the Ribbon and select Outline.

-
Click the Group dropdown and select Auto Outline.
-
Excel will attempt to group rows based on identifiable patterns, such as subtotals (summary rows).
Note: Auto Outline works best when your data follows a structured format with clear subtotals.
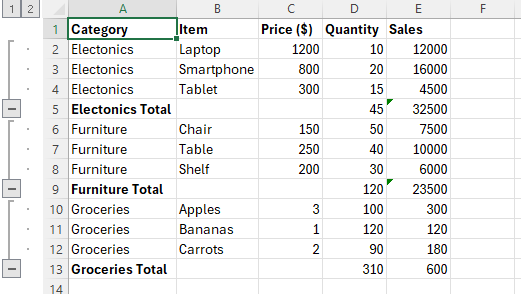
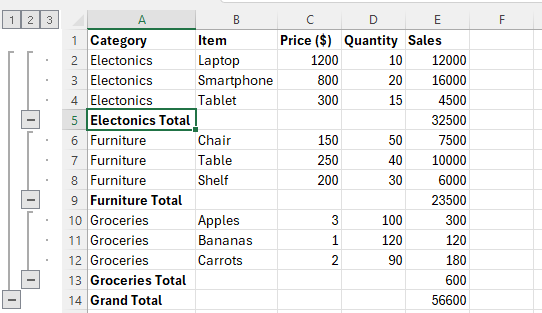
2. Manual grouping (Customized nested grouping).
You may need to opt for manual grouping when your dataset does not follow a clear structure that Excel can automatically detect. It is also useful when you want precise control over which rows to group, especially for customized nested grouping.
- Select the first group of rows that you want to group.
- Go to the Data tab and click Group in the Outline section.

- Choose Rows and click OK—this creates the first-level group.
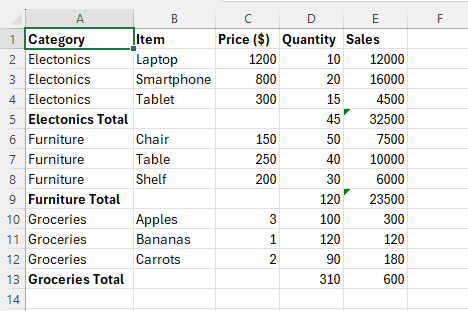
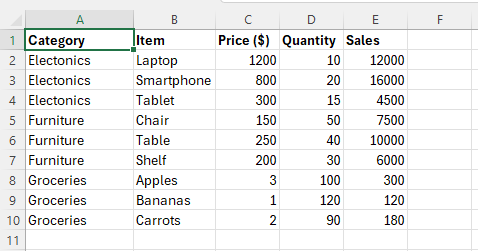
- Now, select a subset of rows within the existing group (e.g., group "Electronics" and "Furniture" separately).
- Repeat the Group process to create a nested (hierarchical) group.
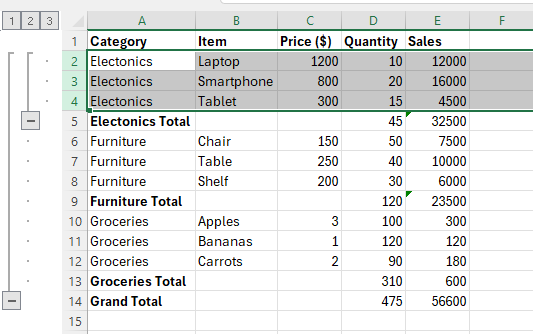
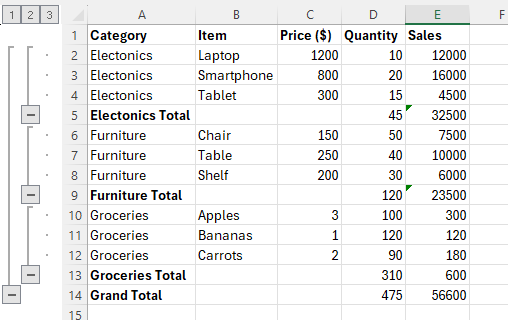
Final result:
Quick keyboard shortcut:
Use Alt + Shift + Right Arrow to quickly group selected rows.
Read more: How to group columns in Excel.
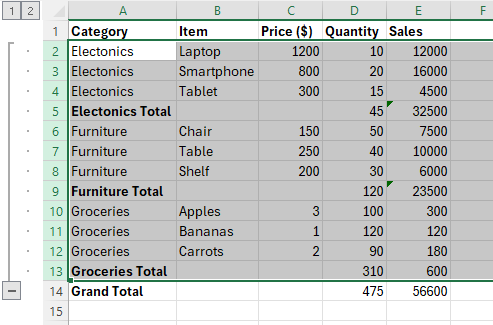
Navigating Grouped Data
Excel provides simple controls to manage your group rows. The small minus (-) and plus (+) buttons next to grouped rows allow for quick collapsing and expanding. Additionally, the outline symbols in the top-left corner offer a structured way to manage multiple levels of grouping.
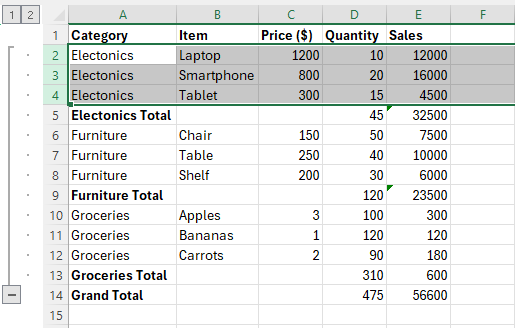
1. Collapsing and expanding groups.
-
Click the minus (-) sign to collapse grouped rows.
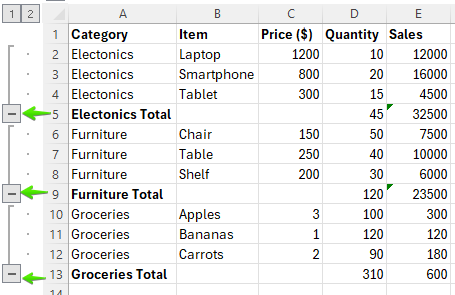
-
Click the plus (+) sign to expand grouped rows again.
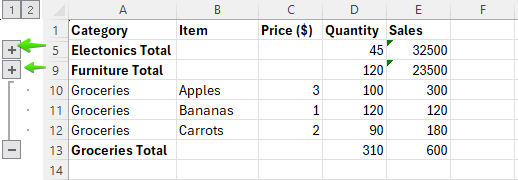
2. Using outline levels.
Excel displays numbers (1, 2, 3…) at the top-left corner of your sheet, indicating different grouping levels. Clicking these numbers collapses or expands all groups at that level.

How to Ungroup Rows
It isn't permanent when you group rows of data in Excel. If you ever need to remove grouping, follow these steps:
-
Select the grouped rows.

-
Navigate to the Data tab.

-
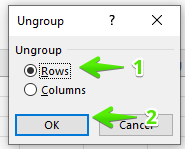
Click Ungroup in the Outline section.
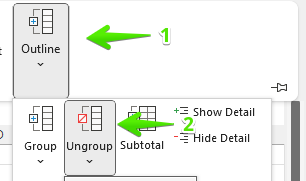
- Once the Ungroup dialog box pops up, click "Rows" and then "OK" to complete the regrouping.
Alternatively, use the Excel shortcut Alt + Shift + Left Arrow.
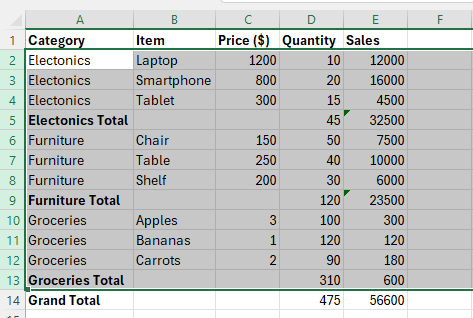
How to Group Rows in Excel with the Subtotal Feature
The Subtotal feature in Excel automatically groups and calculates summaries (e.g., sum, average, count) for categorized data. If you need automated grouping with calculations:
-
Ensure your dataset includes category columns.
-
Click anywhere inside the dataset.
-
Go to the Data tab and select the Subtotal command in the Outline group.

-
Choose the column where you want to insert summary rows and click OK.
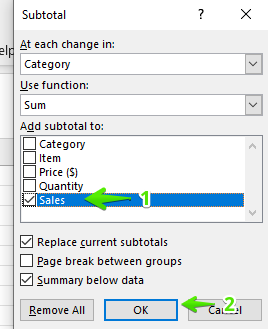
- Final result:
Tips and Best Practices
To make the most out of Excel's grouping feature, you should follow best practices that enhance efficiency and minimize errors. Here are practical tips to ensure seamless grouping:
-
Keep data structured – Avoid empty rows that may disrupt grouping.
-
Use outline symbols wisely – These help navigate grouped sections faster.
-
Be cautious when sharing grouped data – Hidden rows may be overlooked when printing or sharing sheets.
Common Issues and Troubleshooting
Though Excel grouping is usually straightforward, you may encounter issues when grouping rows in Excel. Let's explore common issues users face along with practical solutions to help you troubleshoot and resolve them.
-
Grouping buttons (outline symbols) are not showing up.
-
Check if your worksheet is protected. Unprotect it from the Review tab.
-
Go to File > Options > Advanced, scroll to the Display options for this worksheet, and ensure Show outline symbols is enabled.
-
-
Groups not collapsing or expanding properly,
-
Ensure no merged cells are within grouped rows, as this can interfere with functionality.
-
If auto-grouping doesn’t work, try manual grouping.
-
Conclusion
Grouping rows in Excel is a valuable skill for managing large datasets efficiently. By learning the different grouping methods, you can enhance your sheet's readability and streamline data analysis. We have also included some best practices and provided information on how to troubleshoot common issues.
Visit Simple Sheets for more easy-to-follow guides and examples, and remember to visit the related articles section of this blog post.
For the most straightforward Excel video tutorials, Subscribe to Simple Sheets on YouTube!
FAQ
1. How do I quickly group rows in Excel?
You can group rows by selecting them, navigating to the Data tab, and clicking Group. Alternatively, use the shortcut Alt + Shift + Right Arrow.
2. Can I create multiple levels of grouped rows?
Yes, you can create nested groups by selecting subsets of an already grouped section and repeating the grouping process. This allows for hierarchical data organization.
3. How can I expand grouped rows in Excel?
To expand rows in Excel, click the plus (+) sign next to the collapsed group. Alternatively, use the outline numbers at the top-left to expand all groups at a specific level.
Related Articles
How to Calculate Z Score in Excel
Want to Make Excel Work for You? Try out 5 Amazing Excel Templates & 5 Unique Lessons
We hate SPAM. We will never sell your information, for any reason.

