How To Use Fill Function in Excel: Auto-Fill Feature
Apr 02, 2023
Do you always find yourself swamped with data entry tasks? Are you ready to simplify your everyday Microsoft Excel routine?
You're in luck because the Auto Fill function is your lifesaver. It's a nifty Excel feature that helps automate many of your tedious day-to-day processes – not just data entry.
This quick guide will tell you how to use the fill function in Excel to maximize its potential and reduce the time it takes to manage data.
Read on as we cover the following:
-
What Is the Auto-fill Feature in Excel?
-
How to Use the Autofill Excel Feature
-
How to Use the AutoFill Excel Options Box
-
Final Thoughts on How to Use the Fill Function in Excel
-
Frequently Asked Questions on How to Use Fill Function in Excel
Read Also: How to Wrap Text in Excel Automatically and Manually
What Is the Auto-fill Feature in Excel?
When you enable the Fill handle, Autofill in Microsoft Excel or the Fill command can fill a range in a specific direction. The data range values are either copied from the first selected cell or based on the example of more than one cell.
You can fill the range downward or upward or towards the right or left. A fill handle is a small square at the right corner of a selected cell or range.
Moreover, a file handle is an important part of the AutoFill feature in Excel. When dragging the mouse over the fill handle, it shifts from a square to a black cross sign.
You can drag the fill handle in only one direction at a time, and you can't drag it diagonally.
Read Also: How to Add Leading Zeros in Excel [Best Methods]
How to Use the Autofill Excel Feature
Let's look at some examples to gain a more comprehensive understanding of how the Autofill Excel feature works:
-
Click on the box labeled B1 to enable the fill handle. Move the mouse to the lower-right corner of B1.
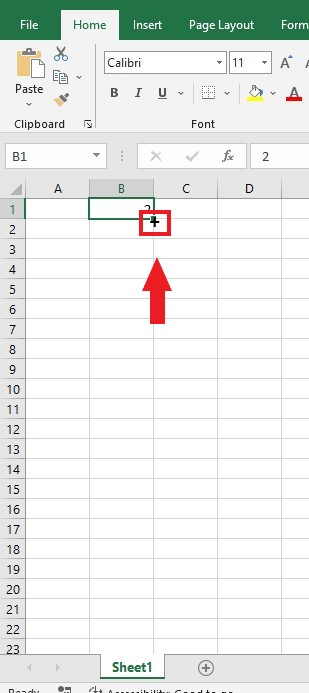
You will see a black plus sign in a red box. This symbol is the Fill handle, which changes shape when you move your mouse over it.
-
Drag the fill handle to cell B9.
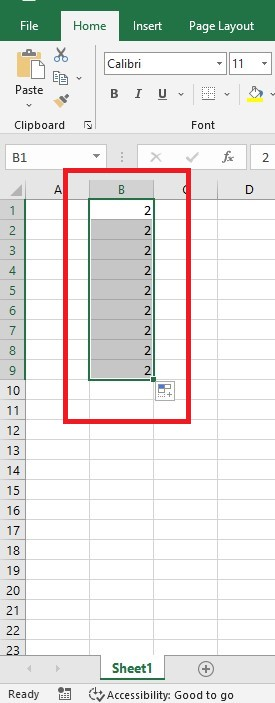
Based on the image above, it fills cells B2 to B9 with the number 2. Excel copies the value from cell B1 into all of these other cells.
How to Use the AutoFill Excel Options Box
Autofill Options Box offers different ways to fill in Excel. These are the following options:
The Copy Cells Option
The Auto Fill and Copy Cells options will copy the first cell's value to all the other cells you chose.
-
Select more than one cell and use Autofill by dragging downwards.
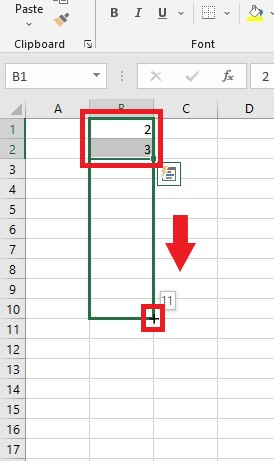
-
In the Autofill options box, click the Copy Cells option. You will notice it fills the other cells of the first two selected cells.
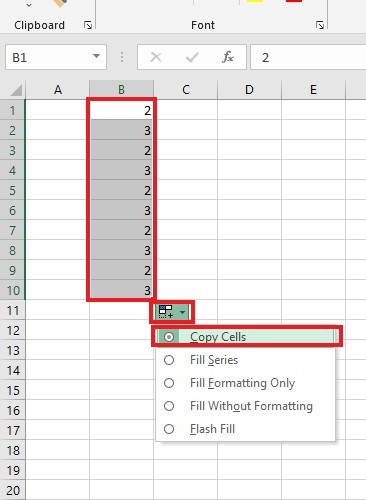
The Fill Series Option
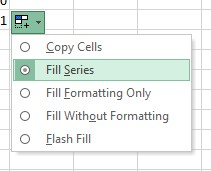
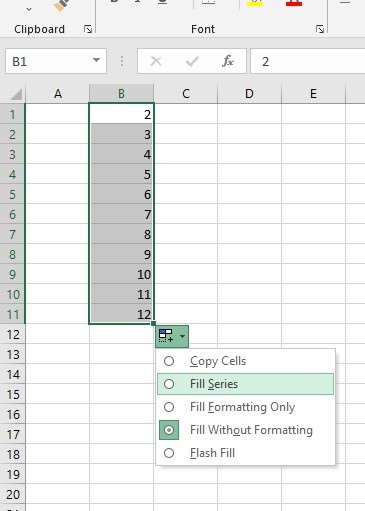
The Fill Series option aims for numerical, mixed numerical, and text values. It fills the range with values based on the sequence or range detected.
-
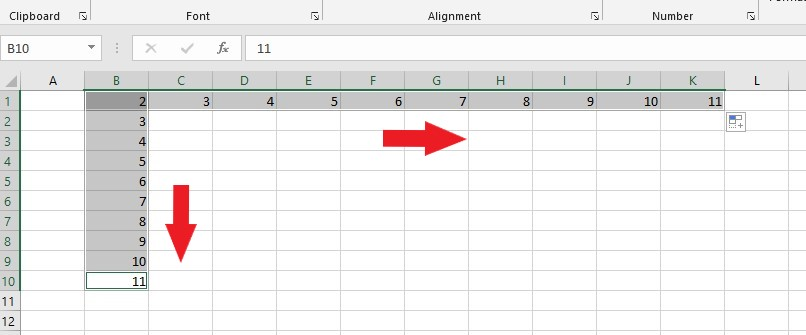
Drag the Fill handle downward or rightward and select the "Fill Series" option. It will fill the range with numbers in increasing order, such as 2 to 11.
-
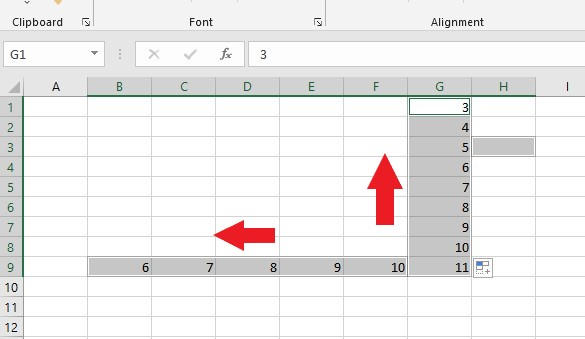
Drag the fill handle upwards or towards the left and select the "Fill Series" option. It will fill the range with decreasing order of numbers, such as from 11 to 6 and then 3.
The Fill Formatting Only Option
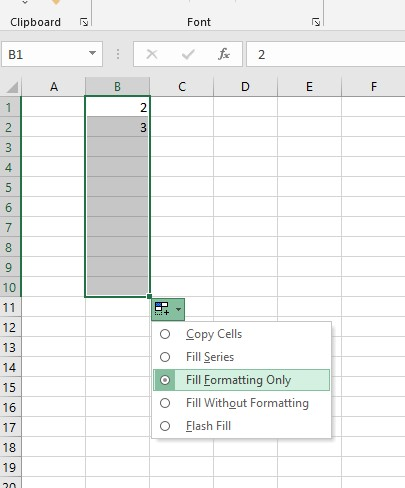
The Fill Formatting Only option copies the formatting of the first selected cell to the rest of the selected range without entering any new data.
Fill Without the Formatting Option
The Fill Without Formatting option will copy the value of the initially selected cell to the selected range. If one or more cells are initially selected, this option will fill the range based on a pattern. However, it does not copy the selected cell's formatting.
Read Also: Cell Styles in Excel (In Easy Steps)
The Flash Fill Option
The Flash Fill Feature automatically fills the selected cell range based on the pattern detected. This feature works for both numerical and textual values. It also works for a combination of textual and numerical values.
-
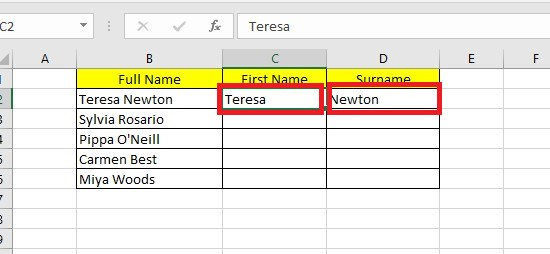
Extract at least one value for each initial cell.
-
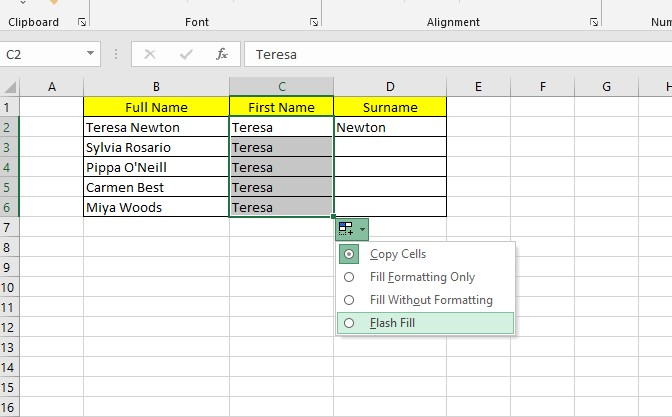
Drag the Fill handle downwards, click the Auto Fill options, and select the Flash Fill option. Do the same method in the Surname column.
-
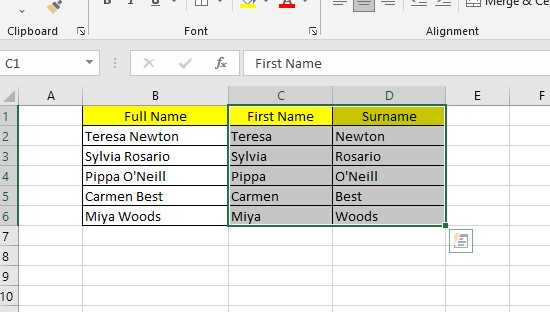
Excel will detect a pattern and fill the remaining cell range. Ensure that the output column, which enters the desired value, is adjacent to the source column.
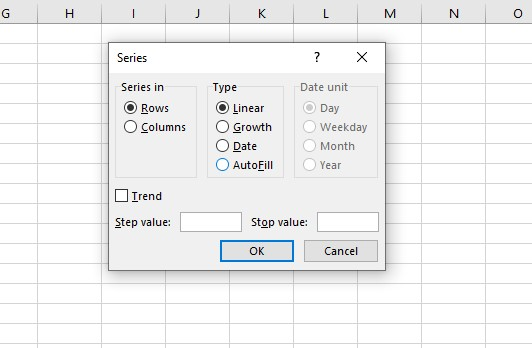
The Series Option
The Series option opens a series dialog box with several advanced possibilities.
Read Also: Simple Google Sheets Sum of Column Guide (Easy Ways)
Final Thoughts on How to Use the Fill Function in Excel
Using the Fill function in Excel can help you save time when entering data. It can quickly create the database with no stress. With a few clicks, your spreadsheets will automatically calculate for you.
For more easy-to-follow Excel guides and the latest Excel Templates, visit Simple Sheets. Check out the Related Articles section for more tips.
Subscribe to Simple Sheets on YouTube for the most detailed Excel video tutorials!
Frequently Asked Questions on How to Use Fill Function in Excel:
How can I use Auto-Fill values for Custom Lists?
-
Go to the File tab.
-
Click Options and Advanced.
-
In the General section, select Edit Custom Lists.
-
You'll see the default lists, but you can also make your list.
-
Type the data in a cell and drag it down to the last cell.
What is the advantage of the Fill handle when I use it?
You can use the fill handle to copy formulas from other cells. Drag the handle to different cells, and Excel will show the results.
How can I use Auto Fill without dragging the fill handle?
You can use your keyboard to fill in Excel quickly. Press Ctrl+D to fill down a column. Press Ctrl+R to fill across a row.
Related Articles:
Beginners Guide: How To Change Cell Styles In Excel
Want to Make Excel Work for You? Try out 5 Amazing Excel Templates & 5 Unique Lessons
We hate SPAM. We will never sell your information, for any reason.


